Fred Picker Archives - jbhphoto.com Blog
Fred Picker Archives
ZONE VI; THE END
 It has finally happened! I have used Zone VI chemicals for well over twenty five years now. Though we have moved on to different formulations for finished prints, we have continued to use Zone VI Print Developer for proofing. That is. . . until now. I mixed the last bag for proofing our 2015/2016 trip and that is that. This has been a looming change that has been in the back of my mind for several years now and it finally came time to do some testing. OH Drat. . . TESTING!!!
Remembering a conversation from years back someone, somewhere, said that Zone VI Print Developer was just D-72. . . or maybe Dektol? There is one sure fire way to find out. . . “TRY IT” as Fred would say. And that is exactly what I did.
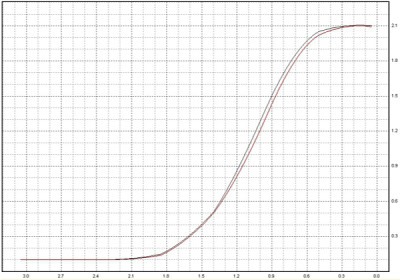
I mixed a liter batch of D-72 and used the last of the Zone VI Print Developer in a side-by-side test. First I exposed two sheets of our proofing paper, set to Grade #2, to a Stouffer 21-Step Wedge. Processed one sheet in each developer and finished as usual. Both developers were diluted 1:3, all temperatures were matched and the Zone VI Compensating Developing Timer was used on each.
After the test sheets were dry, I measured them with an XRite 810 densitometer and plotted the curves with the BTZS Plotter app. I knew from the numbers they would be a near match and the resulting graph shows very little difference. That pretty much settled that. (NOTE: In the plot, the black line is D-76 and the red is Zone VI.)
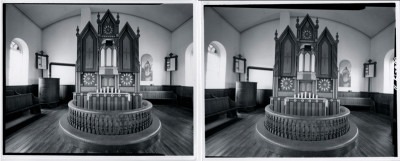
There was only one more test required to convince me, and that was making a real proof. I chose a familiar negative and exposed two more sheets of paper using this negative. Each sheet of paper was developed in the same fashion as the step wedge prints and finished as usual. The two proofs were a near identical match. The Zone VI was very slightly less contrasty, but that could have been due to the fact that the developer was old. The main thing I was looking for was to be sure the color of the two proofs were the same. They are, to my eye at least, exactly the same color. (NOTE: The proofs below, on the left is the D-72 and on the right is the Zone VI.)
All that was left to do was to make a new paper grade test to confirm the enlarger VCCL settings required to print a grade #2 and that was the end of the testing. FYI; Here is how to calibrate a VC enlarger, “USING BTZS TO CALIBRATE A VARIABLE CONTRAST COLD LIGHT” originally published in the Sep/Oct 2007 issue of View Camera Magazine. I have added the formula for D-72 to the FORMULAS area of the jpbhphoto.com BLOG.
It’s a sad day but finally Zone VI, as a supplier of darkroom chemistry for us, is gone forever. The good news is, it is possible to mix your own developer and achieve the same results that we have become accustom to over the years. Proper proofing is the control and the verification that your technique is working as you think it should. It is important to keep the proofing process as consistent as possible. I believe we are good to go without Zone VI now. Thanks Fred for all you did for traditional film photography!
JB
March 22, 2016 | Categories: B&W Paper, Darkroom, Photography | Tags: Darkroom Formulas, Film Photography, Fine Art Photography, Fred Picker, JB & Susan Harlin, Zone VI | Leave A Comment »
OVER 25 YEARS OF MPD & STILL GOING
For me, I prefer simplicity when I am out making photographs. I do not want to get bogged down with a lot of complexity. I struggled with film exposure and development, like I would speculate that most everyone has when they first start out trying to understand film photography. It was way back in the mid 1970’s when I realized I could process and print my own photographs. This was a big deal for me. It started a lifetime involvement with photography and the wet darkroom.
I stumbled around, trying this and that looking for that magic technique that would give me a negative that would print what I saw in my mind’s eye in the finished print. I read everything I could find on the subject. I even toyed with the idea of becoming a strict Zone System practitioner. Thing was, everything I looked into was just way too complicated. There had to be a simpler way. . . at least, that is what I thought.
Somewhere in the 1980’s I discovered Fred Picker and his “Zone VI Workshop” book. This was exactly what I was looking for. It made sense and contained a simple approach that I found worked! Having found someone that was also into simplicity, I subscribed to the Zone VI Newsletter. I remember really getting excited when I discovered the latest issue in the mailbox. Plenty of opinion and advice that really made sense. To this day I still have my complete set of these newsletters. About 25 years ago when I seriously decided to start working with large format photography, I read the entire set again. . . three times. . . every issue, #1 through #83.
I had experimented previously with what Fred called MPD (Maximum Printable Density) back in my early days in photography. I had very good results, but I drifted away from the darkroom for a while to concentrate on a career. When I moved back into photography after a brief hiatus, I dove right into large format. I needed to relearn my darkroom skills, at least to the point where I had left off and establish a sound working technique.
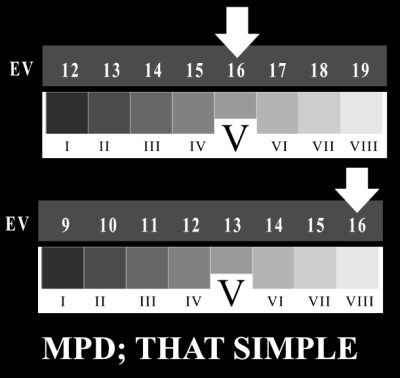
MPD is such a simple approach to exposing film that most think it will not work. It is deceptively simple for sure! I did some experimenting to get back into the groove and continue my experiments with simplicity. I found that MPD was just what it claims to be. . . SIMPLE. . . and well-suited for any film format! I am a big fan of ‘simple’ for sure. As with anything, it is ludicrous to use something that does not work. Why make it worse on yourself. I approached MPD with the idea, that as long as it works, I will use it.
It is funny how there are things that just seem to fit you and continue to do so. It has been over 25 years now and I still use MPD. Why? Because it works! My wife uses it and she is sold on the idea of simplicity also. If you have seen any of our original prints from LF negatives, you have seen film exposed using MPD.
Oh, guess I forgot to mention exactly how simple MPD is in practical use. Here goes, don’t blink; 1. Find your subject, compose as you wish. Not much new there. But, here it comes. 2. Meter the area you wish to render as a Zone VIII. White painted wall, snow, sand. . . whatever you wish to print as finely textured white (Zone VIII). Meter that area. 3. Open up three stops, or place the reading on Zone VIII if your meter has a Zone Dial. 4. Set your exposure and expose the film.
It is actually even easier than that;
1. Meter
2. Place VIII
3. Expose. . . DONE!
Now, don’t believe this is a haphazard way of working. First, you must do your film testing. You need to establish your working EI (Exposure Index) and your normal (N) developing time. You need to establish a proper proofing regiment. Your proper proofs are your control. They tell you just how you are doing with film exposure and developing. Study your proper proofs and make fine adjustments on the fly. Thing is, once you find a starting point, things get much easier. You do not have to engage in never-ending testing. Test once. . . find that starting point. As Fred Picker said, “Get one foot on a rock.” Then you use your proper proofs for fine tuning and a constant check on how you are doing. Simple!

Are you interested in making really good negatives? Want to understand proper proofing, personal film speed and developing times? How about getting started using MPD? Interested in getting the technical stuff behind you?
I was asked how to use MPD and what testing was necessary years ago. I wrote “THE FILM EXPOSURE WORK BOOK” specifically for those interested in learning where to start. This 44 page book is now available for download in e-book format from our online store. You will learn how to establish your working EI. Determine your N and N+1 1/2 developing times. Proper Proofing is covered and much more. You will also get a printable 12 page Work Sheet to record your testing results.
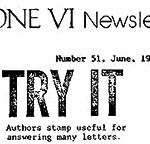
Is MPD right for you? If you are just starting out with film, it just might be if you are interested in a simple, reliable method for making the best possible negatives. Fred Picker had a large rubber stamp that said TRY IT. He used it to answer letters people wrote to him asking questions. You will only know if you TRY IT. It has worked well here for over 25 years!
JB
May 7, 2015 | Categories: Commentary, Darkroom, How-To, Photography | Tags: Film Photography, Fine Art Photography, Fred Picker, JB & Susan Harlin, wet darkroom, Zone VI | Leave A Comment »
WADDAYA KNOW. . . FILM IS STILL NOT DEAD
 This is a fascinating little film made by Indie Film Lab and sponsored by Kodak. Rather than try to explain it all, here is what they have to say;
Published on Nov 16, 2013
Earlier this year, Indie Film Lab took a trip from Montgomery, AL to Las Vegas, NV for the annual WPPI trade show. After we decided it would be more interesting to travel via RV than plane, we started planning our trip around the places we wanted to see. Originally, we had an idea to create a 5-10 minute video of our trip, for fun, then Kodak came on board and our project has turned into a 47 minute feature. The film has now turned the focus less on the trip, to more on the photographers themselves and why they shoot film. We can’t thank Kodak and all our friends who helped and supported us and our project. We hope you enjoy the film and are inspired to create things you truly care for, in a way you are truly passionate. Long Live Film.
You can find the film on YouTube at this address:
http://www.youtube.com/watch?v=sjtphPVchJI&feature=youtu.be
I suggest if you are a photographer or are interested in photography, that you sit down and take the time to watch this 47 minute video. Listen carefully to what the people are saying. Take note that those interviewed are not a bunch of old fogies “dinosaurs” that are bitter about film getting a bad rap. These are young, first generation digital only photographers that are beginning to realize that they have been lied to.
They are beginning to “get it!” They are realizing that digital is not a replacement for film. It is simply another art form. . . another way of working. Listen carefully to how nearly everyone interviewed talks about the look of film being different.
This is a breath of fresh air. Exactly what I was hoping would happen. . . the younger generation has suddenly discovered they have an alternative when it comes to their photographic art. You cannot hide the truth. Truth always rises to the top. Do not be fooled into thinking anything is a dead ringer replacement for anything else. You can bank on it!
Shoot digital. . . shoot film. . . it does not matter to me. Just don’t tell me film is dead and that digital is a replacement for film. Digital can not do everything film can, nor can film do everything digital can. Not so. . . choose your tools wisely. As Fred Picker used to say;
“Different Is Not The Same!”
JB
November 24, 2013 | Categories: Commentary, Film, Photography | Tags: Film Photography, Fine Art Photography, Fred Picker, Ilford Film, JB & Susan Harlin, Kodak Film | Leave A Comment »
CONSISTENCY IS THE SECRET
 Working in the wet darkroom processing both film and paper is nothing more than simple lab work. You are a lab technician in charge of performing a series of processes. These processes must be done exactly the same way each and every time in order to guarantee consistent results. Any variation in process or mixtures will affect the end result.
You have to keep track of exactly how you process both film and paper. Consistency is of paramount importance when processing film. You only have one chance with your film and if you make a mistake there is no going back. If you happen to make a mistake when printing you can always start again. You only lose a sheet of paper. With the film, you loose the image forever.
It is imperative that you do everything exactly the same every time. Any variation, even down to the tray sizes and volume of chemical can affect the end result. Film processing is not hard, but you have to do everything exactly the same every time. It is also worth mentioning that you have to be scrupulously clean. Contamination of any of the processing chemicals can cause disastrous results. One thing that is easily overlooked is mixing up the stock solution tops when using developers that have more than one part. Only remove one cap at a time and replace each before opening the next. Also, mark each cap and never mix them up.
Good darkroom habits begin with keeping notes. I keep a three ring binder containing notes on all of the procedures that I use in the darkroom. I have notes for each film size that includes the size of the trays, chemical mixtures, volumes of chemicals, and number of sheets of film for each processing run. When I begin a film processing session, the first thing I do is grab my darkroom notes. I make sure that I do the exact same thing every film run.
Even the printing process needs to have order and a plan to ensure you do not end up chasing your tail. My darkroom notes also contain information that pertains to printing. Though not as critical as film, I want to be sure I do things in an orderly and repeatable manner. I also want to be sure I mix all of my chemicals correctly, so everything is written down.
One of my favorite darkroom stories comes from Fred Picker. In his information packed little book titled “ZONE VI WORKSHOP” he describes his early days trying to get a handle on the process of B&W printing. If you have a copy of this gem of a book, turn to page 40 and read the chapter titled “THE CUSTOM LAB.” This is a really good account of how NOT to print.
I keep notes on most everything I do in the darkroom. There are times when I cannot remember exactly how I did something. With my notes there is no question as to how to remain consistent. As Fred Picker used to say, “DIFFERENT IS NOT THE SAME!”
JB
March 24, 2013 | Categories: Commentary, Darkroom, Photography | Tags: darkroom, Film Photography, Fine Art Photography, Fred Picker, JB & Susan Harlin, ULF Photography, Zone VI | Leave A Comment »
HAVE YOU EVER HEARD OF FRED PICKER?
 Never heard of Fred Picker? How about Zone VI Studios? If not, and if you are a serious practitioner of photographic art, I would suggest you learn about all of the aforementioned.

Fred Picker originally was a commercial photographer that developed a one-of-a-kind photographic specialties business in Vermont. Zone VI Studios manufactured and sold view cameras, B&W darkroom supplies and custom built equipment. Sadly Fred sold Zone VI to Calumet Photographic in the 1990’s. He stayed on for a few years and finally retired completely. Calumet has slowly phased out Zone VI products and they are now relegated to only being available used. Sadly Fred died in 2002. This was a great loss to the photographic community.
One of the best things that Fred left for all of us fellow artists is his newsletter. He published the Zone VI Newsletter, a quarterly little pamphlet filled with wisdom, wit and information, from 1973 till 1995. There are 83 newsletters in the collection and if you can find a set for a reasonable price, buy it! (Watch eBay)
Fred Picker also authored a great book for the beginning B&W photographer titled “The Zone VI Workshop.” This is another good book to add to your library. It is based on simplicity itself, and if you are a beginner experimenting with B&W, you need to read this book.
If you can find a copy of one of the Zone VI Catalogs, this is also a great reference for your collection. Not that any of the items are still available, but just as a collector’s item for your reference.
We still own Zone VI 4×5 and 8×10 cameras. These are well-designed, rugged, bullet-proof view cameras. If you are thinking of getting a wooden field camera, be sure not to pass up a look at a used Zone VI.
Zone VI also manufactured several innovative and unusual pieces of equipment for the darkroom. The Zone VI Compensating Enlarging Timer and Compensating Developing Timer are a permanent fixture in our darkroom. Though none of this equipment is available new, you can find it used. Check out eBay, and be ready to pay near original retail for some items. They are that good!
So. . . if you have never heard of Fred Picker, and are serious about B&W photography, you should take the time to familiarize yourself with the man and his products. We have a complete Zone VI Newsletter Index on our web site available FREE as a PDF download. Look in the Articles Area.
January 29, 2009 | Categories: Photography | Tags: Film Photography, Fine Art Photography, Fred Picker, JB & Susan Harlin, ULF Photography | 1 Comment »