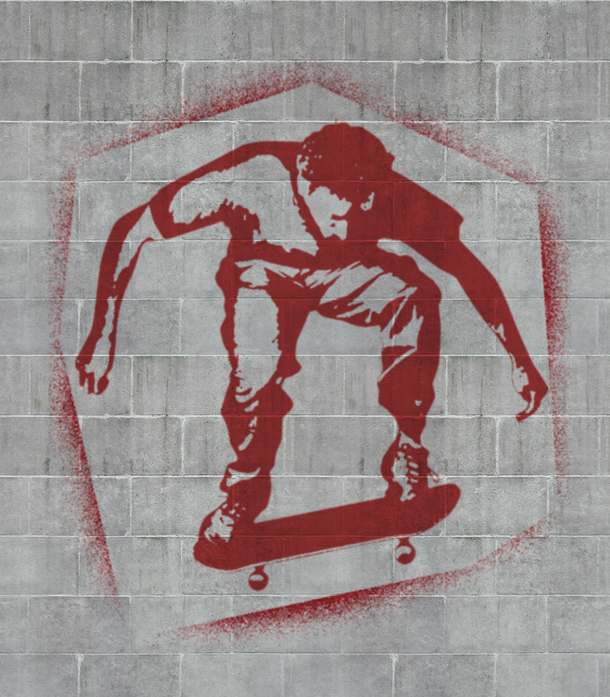
Turn your photos into Banksy graffiti
Urban graffiti has moved on from simple tagging to witty stencil work, thanks largely to the efforts of artists such as Banksy in turning it from an eyesore into a legitimate art form.
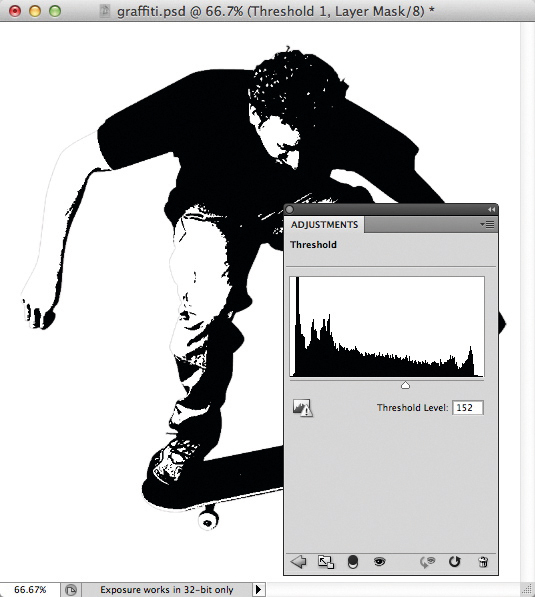
You can use Photoshop’s Threshold adjustment to turn any photograph into pure black and white, which is the ideal way of representing a stencil. It’s possible to drag the Threshold slider to different locations to vary the balance between black and white, but it’s rare that you’ll find an image that works perfectly right across its tonal range. That’s why it makes so much more sense to apply Threshold as an Adjustment Layer. This allows you to tinker with the underlying image until the light/dark contrast works perfectly in all areas.
Choosing the right starting image is important. It needs to be a clear, stark shot with a very recognisable shape. You’re looking for good contrast and texture, which is needed to bring variety into the stencil. Using the Threshold technique, it’s possible to rescue an otherwise featureless region. If your image has a detailed background, you’ll need to select it and erase it.
In the example here, the skateboarder’s T-shirt is an almost featureless dark blue, which naturally turns solid black after the Threshold operation. But because you’re able to make adjustments later, you can use the Dodge tool to brighten up those really dark areas, producing a stencil with much more visual interest. Set the Dodge tool to Midtones to brighten dark areas.
For a true stencil effect, it’s important that the result shouldn’t be too highly detailed. After all, you’re trying to reproduce an image that has been cut out of a sheet of card or paper.
Once the black-and-white image looks the way you want it, make a Merged Copy and then use the Median filter to soften out those hard corners.
When applying the image to the wall graphic, a couple of further steps are needed. Use a Hue/Saturation Adjustment Layer to brighten the image and add colour; make a rough selection and paint a spattering effect outside the image area. Finally, use Gaussian Blur to soften the whole thing for a more natural, sprayed-on look. Duplicate each layer before every new effect, in case you change your mind later and want to make adjustments.
Here’s how you can create a Banksy graffiti stencil in just three easy steps.
Step 01: Set the Threshold
Open an image and choose Layer>New Adjustment Layer>Threshold.
Drag the slider until you get a reasonable balance between black and white without losing the outlines – the effect doesn’t have to be perfect.
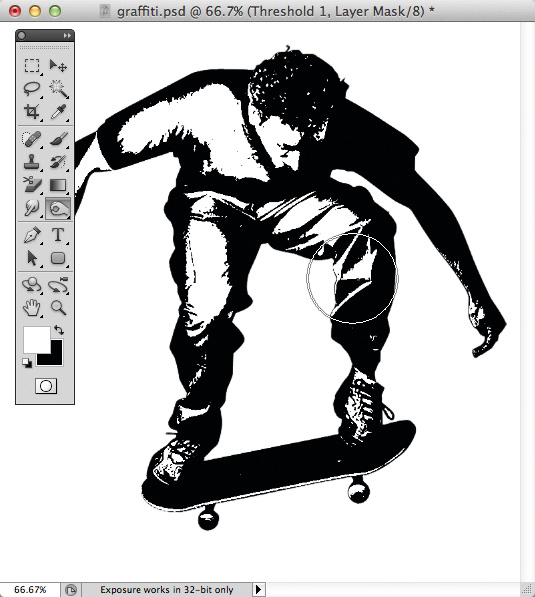
Step 02: Adjust the image
Use the Dodge and Burn tools to brighten and darken regions in the image. Because of the Threshold Adjustment Layer above, the areas that you paint
with these tools will turn either pure white or pure black.
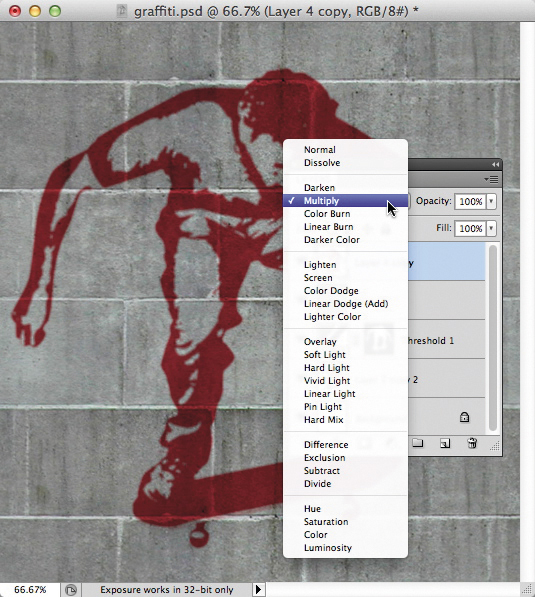
Step 03: Apply to the wall
Make a flattened stencil from a merged copy of the image, then use the Median filter to soften the edges. Change the image Blend Mode to Multiply to get rid of the white, then colour it using a Hue/Saturation Adjustment Layer.
This entry was posted on Saturday, May 5th, 2012 at 8:00 am and is filed under Tutorials. You can follow any responses to this entry through the RSS 2.0 feed. You can skip to the end and leave a comment. Pinging is currently not allowed.
Tags: hot, photoshop tricks
jmeyer | Tutorials | 05/05/2012 08:00am
One Comment