How to combine photos with Photoshop Mix | Adobe Photoshop Mix tutorials

- Creativity & Design
Creative Cloud plans
- What is Creative Cloud?Creative apps and services for everyone
- PhotographersLightroom, Photoshop, and more
- Students & teachersSave over 60% on Creative Cloud
- Small & medium businessCreative apps and services for teams
- EnterpriseSolutions for large organizations
- Schools & universitiesSimple administration and licensing
- View all plans & pricing
Featured products
- Marketing & Commerce
Products and solutions
- What is Experience Cloud?Digital experience solutions
- View all productsEverything in Experience Cloud
- Adobe Experience PlatformFoundation for experiences
- Experience LeagueGuided customer success
- Use casesAddressing your challenges
- IT resourcesInformation for IT leaders
- Services & SupportConsulting, training, and customer care
Featured products
- Advertising CloudCross-channel advertising platform
- AnalyticsReal-time web analytics
- Audience ManagerAudience profile management
- CampaignCampaign management and delivery
- Experience ManagerContent management solution
- Magento Commerce CloudModern commerce platform
- Marketo Engagement PlatformLead management and B2B marketing
- PDF & E-signatures
Overview
Featured products
- Business Solutions
- Support
Combine photos on the go


If you want to re-create the photo composite, you can easily create a copy of the assets with Creative Cloud libraries. Open the Whale in the Sky library in Creative Cloud Assets, and click Save to Creative Cloud to create a copy of the library in your own account.
Once in your Creative Cloud library, you can use these assets to create a photo composite in Photoshop Mix or in Photoshop.
Note: You need to be signed in to your Creative Cloud account to save assets in a library. If you have signed in to use Photoshop Mix, are using a trial version of Photoshop CC, or are a current Creative Cloud subscriber, then you already have an Adobe ID; your username is the email used when you signed in. Get an Adobe ID if you don't already have one.

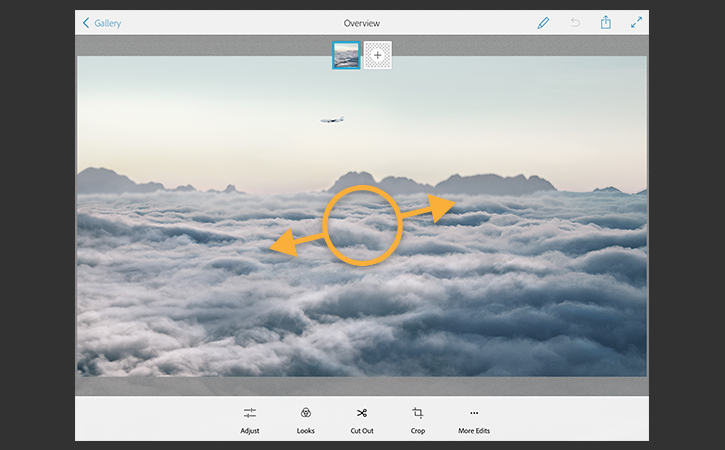
Launch the app on your mobile device, sign in, and tap the + sign to create a new project. Tap Creative Cloud; then tap My Libraries and locate the Whale in the sky library. Tap the Clouds background photo, and then tap Open File to add it as your background.
You can scale, rotate, and move this image using gestures. For example, to exclude the airplane window from the canvas, pinch outward in the center of the photo.
To add another image, tap the + thumbnail and navigate to the Whale in the sky library. Tap the Whale image, then tap Open File. To cut out and separate the whale from its background, tap Cut Out and then scrub over the whale with your finger or a stylus.
The edges of the cutout are refined automatically, but you can experiment with other Cut Out options to make further edits. To undo and redo an operation, tap the curved arrow in the top menu. Tap the checkmark when you're happy with the cutout. Finally, drag the whale to position it in the scene.
Tip: All of your changes are non-destructive. You can return to Cut Out at any time to use Add/Subtract to add or remove areas of the cutout as needed.

Photoshop CC has powerful tools to further enhance your composite image. If you haven’t already, download a free trial of Photoshop CC. When you're ready to take your project to the next level, tap Share in the top menu; then tap Send to Photoshop to automatically open this layered document in Photoshop on your desktop.
Once you launch Photoshop and are signed in to your Creative Cloud account, you'll see your composition there. Let's remove the airplane from the scene. Select the Background in the Layers panel, and click the Rectangular Marquee tool in the Tools panel on the left. Drag a marquee around the airplane to select it—as close to the edges as you can—and choose Edit > Fill. Select Contents: Content-Aware and click OK to seamlessly erase the airplane from its background. See Remove that object to learn more about using Content-Aware Fill in Photoshop.
Tip: You can also move the airplane to a different location in the composition and have Photoshop fill in the background for you. See Retouch photos to learn how to do this.

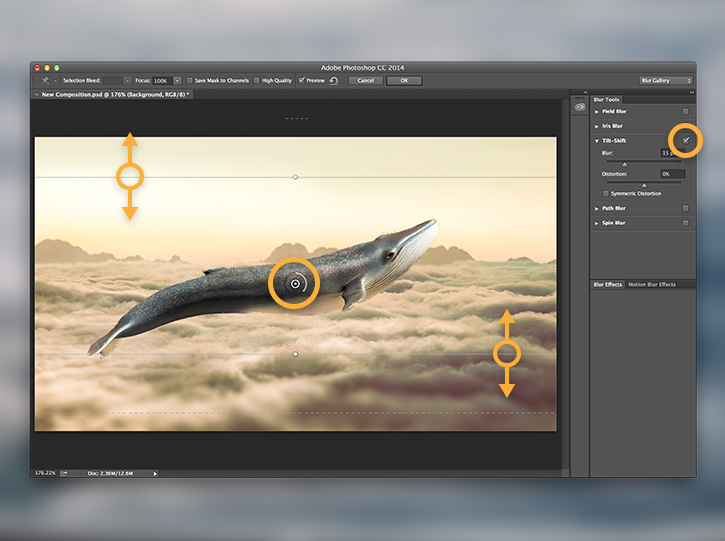
As a bonus, try adding a quick special effect to your photo composite. You can blur the background to focus attention on the whale.
Select the Background layer, and choose Filter > Blur Gallery > Tilt-Shift. In the Blur Tools panel at right, make sure the Tilt-Shift checkbox is selected. Move the circular pin to a position on the whale. Adjust the horizontal lines to change the scope of the blur, and the Blur slider to change the amount of blur. Click OK to apply the special blur effect.
There's much more you can do to the composite image in Photoshop. See Edit your first photo in Photoshop to learn more editing techniques.
Learn more about Adobe's online photo editing software.
Contributors: Mohammed Shamma, Sarah LaMond
Now viewing
 Combine photos on the go
Up next
 Capture patterns on the go to use in Photoshop
  Draw vector art on the go
  Refine a Premiere Clip video
View again
- Copyright © 2018 Adobe. All rights reserved.
- Privacy
- Terms of Use
- Cookies
- AdChoices
Selecting a region changes the language and/or content on Adobe.com.
- Americas
- Brasil
- Canada - English
- Canada - Français
- Latinoamérica
- México
- United States
- Europe, Middle East and Africa
- Africa - English
- België
- Belgique
- Belgium - English
- Česká republika
- Cyprus - English
- Danmark
- Deutschland
- Eesti
- España
- France
- Greece - English
- Ireland
- Israel - English
- Italia
- Latvija
- Lietuva
- Luxembourg - Deutsch
- Luxembourg - English
- Luxembourg - Français
- Magyarország
- Malta - English
- Middle East and North Africa - English
- Nederland
- Norge
- Österreich
- Polska
- Portugal
- România
- Schweiz
- Slovenija
- Slovensko
- Suisse
- Suomi
- Sverige
- Svizzera
- Türkiye
- United Kingdom
- България
- Россия
- Україна
- الشرق الأوسط وشمال أفريقيا - اللغة العربية
- ישראל - עברית
- Asia - Pacific
- Australia
- Hong Kong S.A.R. of China
- India - English
- New Zealand
- Southeast Asia (Includes Indonesia, Malaysia, Philippines, Singapore, Thailand, and Vietnam) - English
- 中国
- 中國香港特別行政區
- 台灣
- 日本
- 한국
- Commonwealth of Independent States
- Includes Armenia, Azerbaijan, Belarus, Georgia, Kazakhstan, Kyrgyzstan, Moldova, Tajikistan, Turkmenistan, Ukraine, Uzbekistan