Victor Savkin
on building applications in Angular
In this blog post I will talk about the three core concepts of Angular 2: components, dependency injection, and property bindings.
Updated: July 6, 2015
Disclaimer
Angular 2 is still in the works. The core concepts are solid, but the API may change. If you find that a code snippet that does not work, please message me, and I will update the blog post.
Let’s Build an App
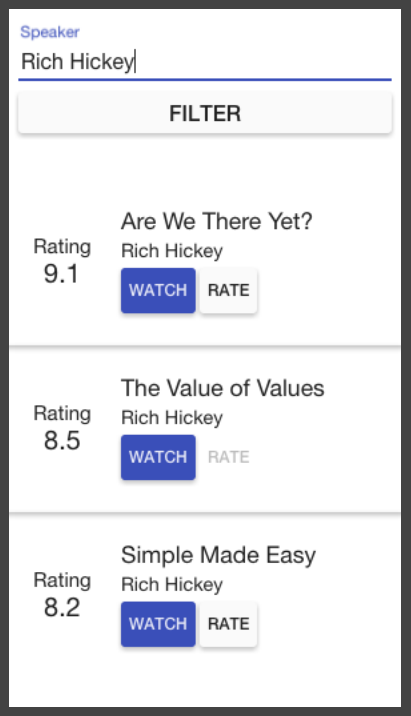
Let’s say we want to build this application, which is a list of tech talks that you can filter, watch, and rate.
Components
To build an Angular 2 application you define a set of components, for every UI element, screen, and route. An application will always have a root component that contains all other components. In other words, every Angular 2 application will have a component tree, which for this application may look like this:
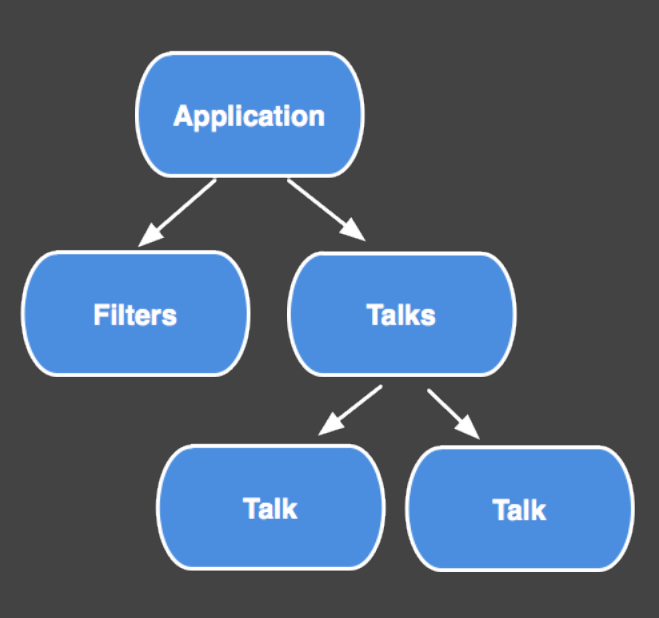
Application is the root component. The Filters component has the speaker input and the filter button. TalkList is the list you see at the bottom. And TalkCmp is an item in that list.
To understand what constitutes a component in Angular 2, let’s look closer at TalkCmp.
TalkCmp.ts:
@Component({
  selector: 'talk-cmp',
  properties: ['talk'],
  events: ['rate']
})
@View({
  directives: [FormattedRating, WatchButton, RateButton],
  templateUrl: 'talk_cmp.html'
})
class TalkCmp {
  talk: Talk;
  rate: EventEmitter;
  //...
}
talk_cmp.html
{{talk.title}}
{{talk.speaker}}
<formatted-rating [rating]="talk.rating"></formatted-rating>
<watch-button [talk]="talk"></watch-button>
<rate-button [talk]="talk"></rate-button>
Property Bindings and Event Bindings
A component has property and event bindings, which are defined in the component decorator.
@Component({
  selector: 'talk-cmp',
  properties: ['talk'],
  events: ['rate']
})
...
Data flows into a component via property bindings, through square brackets. Data flows out of a component via event bindings, through parenthesis.
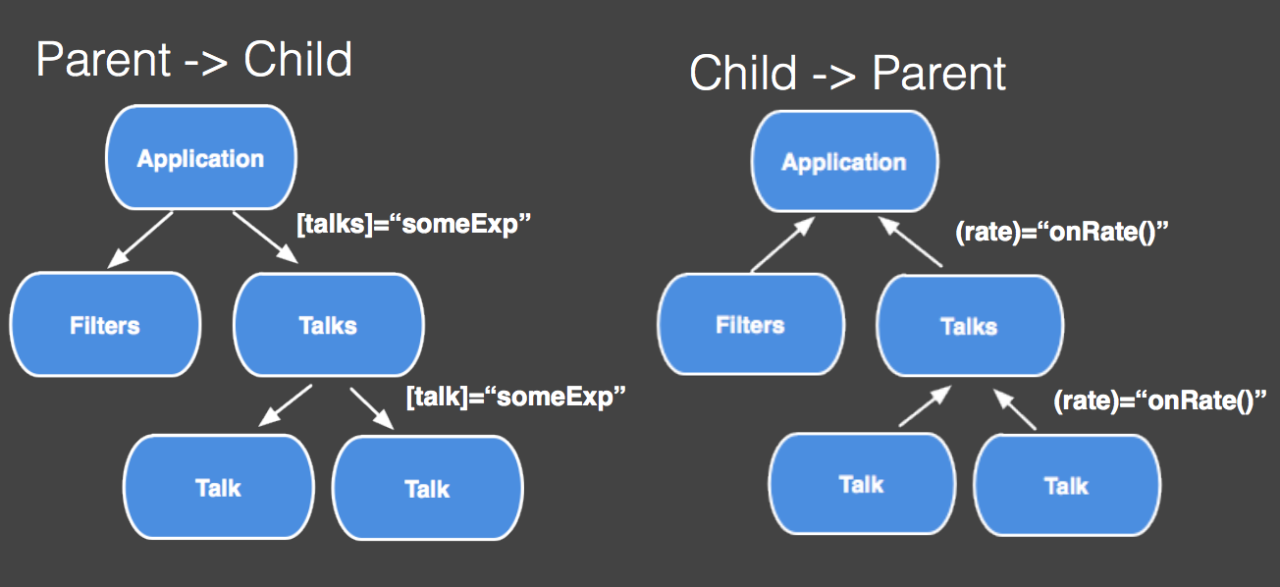
Property and event bindings are the public API of a component. You use them when you instantiate a component in your application.
<talk-cmp [talk]="someExp" (rate)="eventHandler($event.rating)"></talk-cmp>
View
A component has a view, which describes how the component is rendered on the page.
@View({
  directives: [FormattedRating, WatchButton, RateButton],
  templateUrl: 'talk_cmp.html'
})
talk_cmp.html
{{talk.title}}
{{talk.speaker}}
<formatted-rating [rating]="talk.rating"></formatted-rating>
<watch-button [talk]="talk"></watch-button>
<rate-button [talk]="talk"></rate-button>
Angular 2 embraces web platform standards, so it puts the view of the component in the Shadow DOM of the element where it has been created. If your browser does not support Shadow Dom, Angular will emulate it on a par with native shadow DOM.
A view needs to know two things: the list of directives that can be used in its template, and the template itself. You can define the template externally, using the templateUrl, as in the example above, or inline.
...
@View({
  directives: [FormattedRating, WatchButton, RateButton],
  template: `
    {{talk.title}}
    {{talk.speaker}}
    <formatted-rating [rating]="talk.rating"></formatted-rating>
    <watch-button [talk]="talk"></watch-button>
    <rate-button [talk]="talk"></rate-button>
  `
})
...
Lifecycle
Components have a well-defined lifecycle, which you can tap into. The TalkCmp component does not subscribe to any lifecycle events, but some other components can. For instance, this component will be notified when its properties change.
@Component({
  selector: 'cares-about-changes',
  properties: ['field1', 'field2'],
  lifecycle: [onChange]
})
class CareAboutChanges {
  field1;
  field2;
  onChange(changes) {
    //..
  }
}
Bindings
A component can contain a list of bindings the component and its children may inject.
@Component({
  selector: 'conf-app',
  bindings: [ConfAppBackend, Logger]
})
class TalksApp {
  //...
}

class TalksCmp {
  constructor(backend:ConfAppBackend) {
    //...
  }
}
In this example, we have the backend and the logger services declared in the root component, which makes them available in the whole application. The talks component injects the backend service. I will talk about dependency injection in detail in the second part of this article. For now, just remember that components configures dependency injection.
Host Element
To turn an Angular component into something rendered in the DOM you have to associate an Angular component with a DOM element. We call such elements host elements.
A component can interact with its host DOM element in the following ways: * It can listen to its events. * It can update its properties. * It can invoke methods on it.
The component, for instance, listens to the input event using hostListeners, trims the value, and then stores it in a field. Angular will sync up the stored value with the DOM.
@Component({
  selector: 'trimmed-input',
  host: {
    '(input)': 'onChange($event.target.value)',
    '[value]': 'value'
  }
})
class TrimmedInput {
  value: string;
  onChange(updatedValue: string) {
    this.value = updatedValue.trim();
  }
}
Note, I don’t actually interact with the DOM directly. Angular 2 aims to provide a higher-level API, so the native platform, the DOM, will just reflect the state of the Angular application.
This is useful for a couple of reasons:
- It makes components easier to refactor.
- It allows unit testing most of the behavior of an application without touching the DOM. Such tests are easier to write and understand. In addition, they are significantly faster.
- It allows running Angular applications in a web worker.
- It allows running Angular applications outside of the browser completely, on other platforms, for instance using NativeScript.
Sometimes you just need to interact with the DOM directly. Angular 2 provides such APIs, but our hope is that you will rarely need to use them.
Components are Self-Describing
What I have listed constitutes a component.
- A component knows how to interact with its host element.
- A component knows how to render itself, so it knows its view.
- A component configures dependency injection.
- A component has a well-defined public API of property and event bindings.
All of these make components in Angular 2 self-describing, so their annotations contain all the information needed to instantiate them. This is extremely important.
This means that any component can be bootstrapped as an application. It does not have to be special in any way. Moreover, any component can be loaded into a router outlet. As a result, you can write a component that can be bootstrapped as an application, loaded as a route, or used in some other component directly. This results in less API to learn. And it also makes components more reusable.
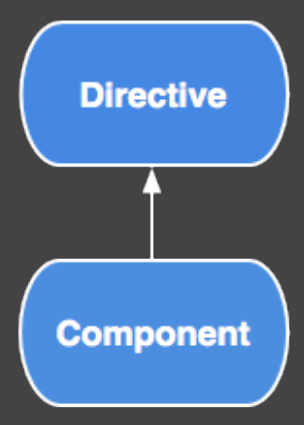
What About Directives?
If you are familiar with Angular 1, you must be wondering “What happened to directives?”.
Actually directives are still here in Angular 2. The component is just the most important type of a directive, but not the only one. A component is a directive with a view. But you can still write decorator-style directives, which do not have views.
Summary
Components are fundamental building blocks of Angular 2 applications.
- They have well-defined inputs and outputs.
- They have well-defined lifecycle.
- They are self-describing.
Dependency Injection
Let’s switch gears and talk about another cornerstone of Angular – dependency injection.
The idea behind dependency injection is very simple. If you have a component that depends on a service. You do not create that service yourself. Instead, you request one in the constructor, and the framework will provide you one. By doing so you can depend on interfaces rather than concrete types. This leads to more decoupled code, which enables testability, and other great things.
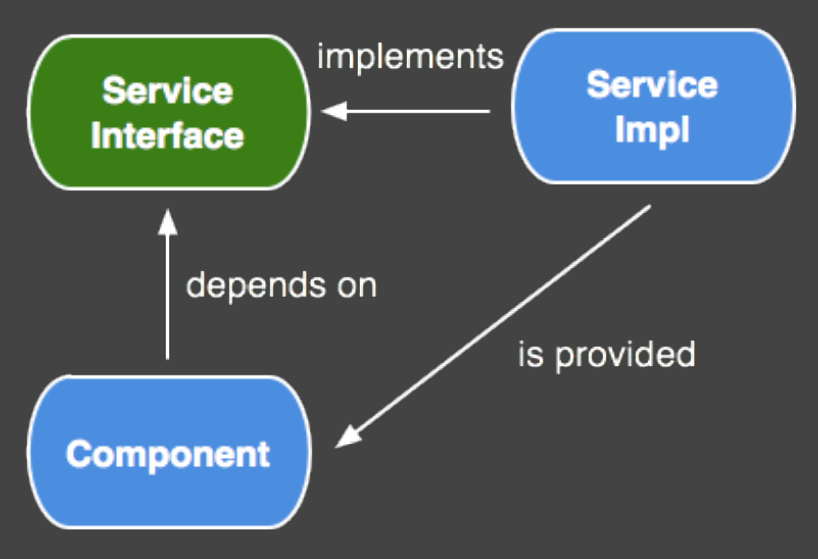
Angular 2 comes with a dependency injection module. To see how it can be used, let’s look at the following component, which renders a list of talks using the for directive:
@Component({selector: 'talk-list'})
@View({templateUrl: 'talks.html', directives: [NgFor]})
class TalkList {
  constructor() {
    //..get the data
  }
}
talks.html
<h2>Talks:</h2>
<div *ng-for="var t of talks">
  {{t.name}}
</div>
Let’s mock up a simple service that will give us the data.
class TalksAppBackend {
  fetchTalks() {
    return [
      { name: 'Are we there yet?' },
      { name: 'The value of values' }
    ];
  }
}
How can we use this service? One approach is to create an instance of this service in our component.
class TalkList {
  constructor() {
    var backend = new TalksAppBackend();
    this.talks = backend.fetchTalks();
  }
}
This is fine for a demo app, but not good for real applications. In a real application TalksAppBackend won’t just return an array of objects, it will make http requests to get the data. This means that the unit tests for this component will make real http requests – not a great idea. This problem is caused by the fact that we have coupled TalkList to TalksAppBackend and its new operator.
We can solve this problem by injecting an instance TalksAppBackend into the constructor, so we can easily replace it in tests, like this:
class TalkList {
  constructor(backend:TalksAppBackend) {
    this.talks = backend.fetchTalks();
  }
}
This tells Angular that TalksList depend on TalksAppBackend. Now, we need to tell Angular how to create one, and we can do it by adding the bindings property to this component.
@Component({
  selector: 'talk-list',
  bindings: [TalksAppBackend]
})
class TalkList {
  constructor(backend:TalksAppBackend) {
   this.talks = backend.fetchTalks();
  }
}
The TalksAppBackend service has to be specified in the TalkList component or its ancestor. So if you prefer to write your apps in the Angular 1 style, you can configure all bindings in the root component. That will make them available for any component in the system.
@Component({
  selector: 'talk-app',
  bindings: [TalksAppBackend] // registered in the root component, so it can be injected into any component in the app.
})
class Application {
}

@Component({
  selector: 'talk-list'
})
class TalkList {
  constructor(backend:TalksAppBackend) {
   this.talks = backend.fetchTalks();
  }
}
Single API
Both Angular 1 and Angular 2 come with dependency injection modules. But in Angular 1 we have several APIs for injecting dependencies into directives: some objects are injected by position (e.g., element), some by name. It is a little bit confusing. Angular 2 provides a single API for injecting dependencies. All of them injected into the component’s constructor.
For instance, this component injects an instance of TalksAppBackend (which is likely to be a singleton), and an ElementRef, which is unique for every component.
class TalksList {
  constructor(elRef:ElementRef, backend:TalksAppBackend) {
  }
}
So we use the same API to inject global and local dependencies into the component. Moreover, a component can inject other components using the same API:
class Component {
  constructor(ancestor:AncestorCmp) {
  }
}
Summary
Dependency injection is one of those features you don’t see the benefits of right away. But the bigger your application grows, the more important it gets.
- It allows you to depend on interfaces, not concrete types.
- This results in more decoupled code.
- This improves testability.
- Angular 2 has one API for injecting dependencies into components.
Property Bindings
Angular uses property bindings to automatically sync up the component tree with the model, and the DOM with the component tree. To understand why this is important, let’s look at this application one more time.
We know that this application will have a component tree. In addition to the tree, it will also have a model. Let’s say it is simple JavaScript object that looks like this:
{
  filters: {
    speaker: "Rich Hickey",
  }
  talks: [
    {
      title: "Are we there yet?",
      speaker: "Rich Hickey",
      yourRating: null,
      avgRating: 9.0
    }
  ]
}
Now, imagine an event changes the model. Say I watched this talk, I really liked it, and I gave it 9.9.
{
  filters: {
    speaker: "Rich Hickey",
  }
  talks: [
    {
      title: "Are we there yet?",
      speaker: "Rich Hickey",
      yourRating: null,
      avgRating: 9.9
    }
  ]
}
If I had to find all the places that might depend on the new value and manually update them, that would be tedious and error-prone. I want the application to reflect this change automatically. That is what property bindings are for.
At the end of the VM turn, Angular will check every component in the component tree. More specifically, it will check every property binding (every square bracket, every pair of curly braces), and will update the components. It will also update the DOM to match the state of the component tree.
Zones
In Angular 1 you have to tell the framework that it needs to run this check by doing scope.$apply. You don’t need to worry about it in Angular 2. Angular 2 uses Zone.js to know when this check is required., This means that you do not need to call scope.$apply to integrate with third-party libraries.
Summary
- Angular uses property bindings to sync up the component tree with the model, and the DOM with the component tree.
- Angular uses zones to know when to do it.
Let’s Recap
Directives, and in particular components, are the most important part of Angular. They are the fundamental building blocks of Angular 2 applications. They are self-describing. They describe their public API, which is inputs and outputs, property bindings and event bindings. They describe their private API, which is lifecycle hooks, and how they interact with the host element. Some components will depend on other components and services. The dependency injection module will provide those. It will construct the component tree, which is the core of any Angular 2 application. Finally, property bindings and zones is what makes Angular 2 applications interactive.
These are the building blocks that form the core of Angular 2. Understanding them is enough to get started with Angular 2, but building a real application will require more than that. That is why we are working on a set of modules built on top of the core to enable great development experience. These include
- A form-handling or input-handling module
- An http client
- A powerful router
- Support for animations
- A suite of UI components, called material components
- Tools for writing unit, e2e, and performance tests
All of them are still in the works, but we are making very good progress.
Learn More
- angular.io has a quickstart, step-by-step guide, and API docs.
- Brian Ford on Zones. Watch it if you want to deepen your knowledge of Zones.
- Change Detection in Angular 2. In-depth overview of the change detection module that powers Angular property bindings.
Recent comments
Notes
 unvael likes this
 mustafa-omega likes this
 danzorx likes this
 vsavkin posted this